Authentic Thai Recipe – Shrimp Chili Dip and Morning Glory with Fresh Coconut Cream
1. Shrimp Chili Dip (นำ้พริกกุ้งสด)
“Nam Prik Goong Sot”
Nam prik goong, or “Shrimp Chili Dip” is very similar to the Central Thai-style dish of nam prik ga-pi, but here we are making a recipe that can be useful as an entire dish on its own (whereas its normally just a dipping sauce). The Southern style recipe uses more roughly cut ingredients (instead of finely mashing them), and also dry roasts the shrimp paste (Ga-pi) on its own before crumbling it into the mixing bowl.
The first time my mother-in-law made this dish, it blew my mind – and years later I am still just as crazy about it.
It is an easy to make Thai food, delicious in its simplicity but still very authentically Thai.
Scroll down now, and let’s get started – we know that you are going to love this Recipe for Shrimp Chili Dip, a classic dish and a personal Thai food favorite.

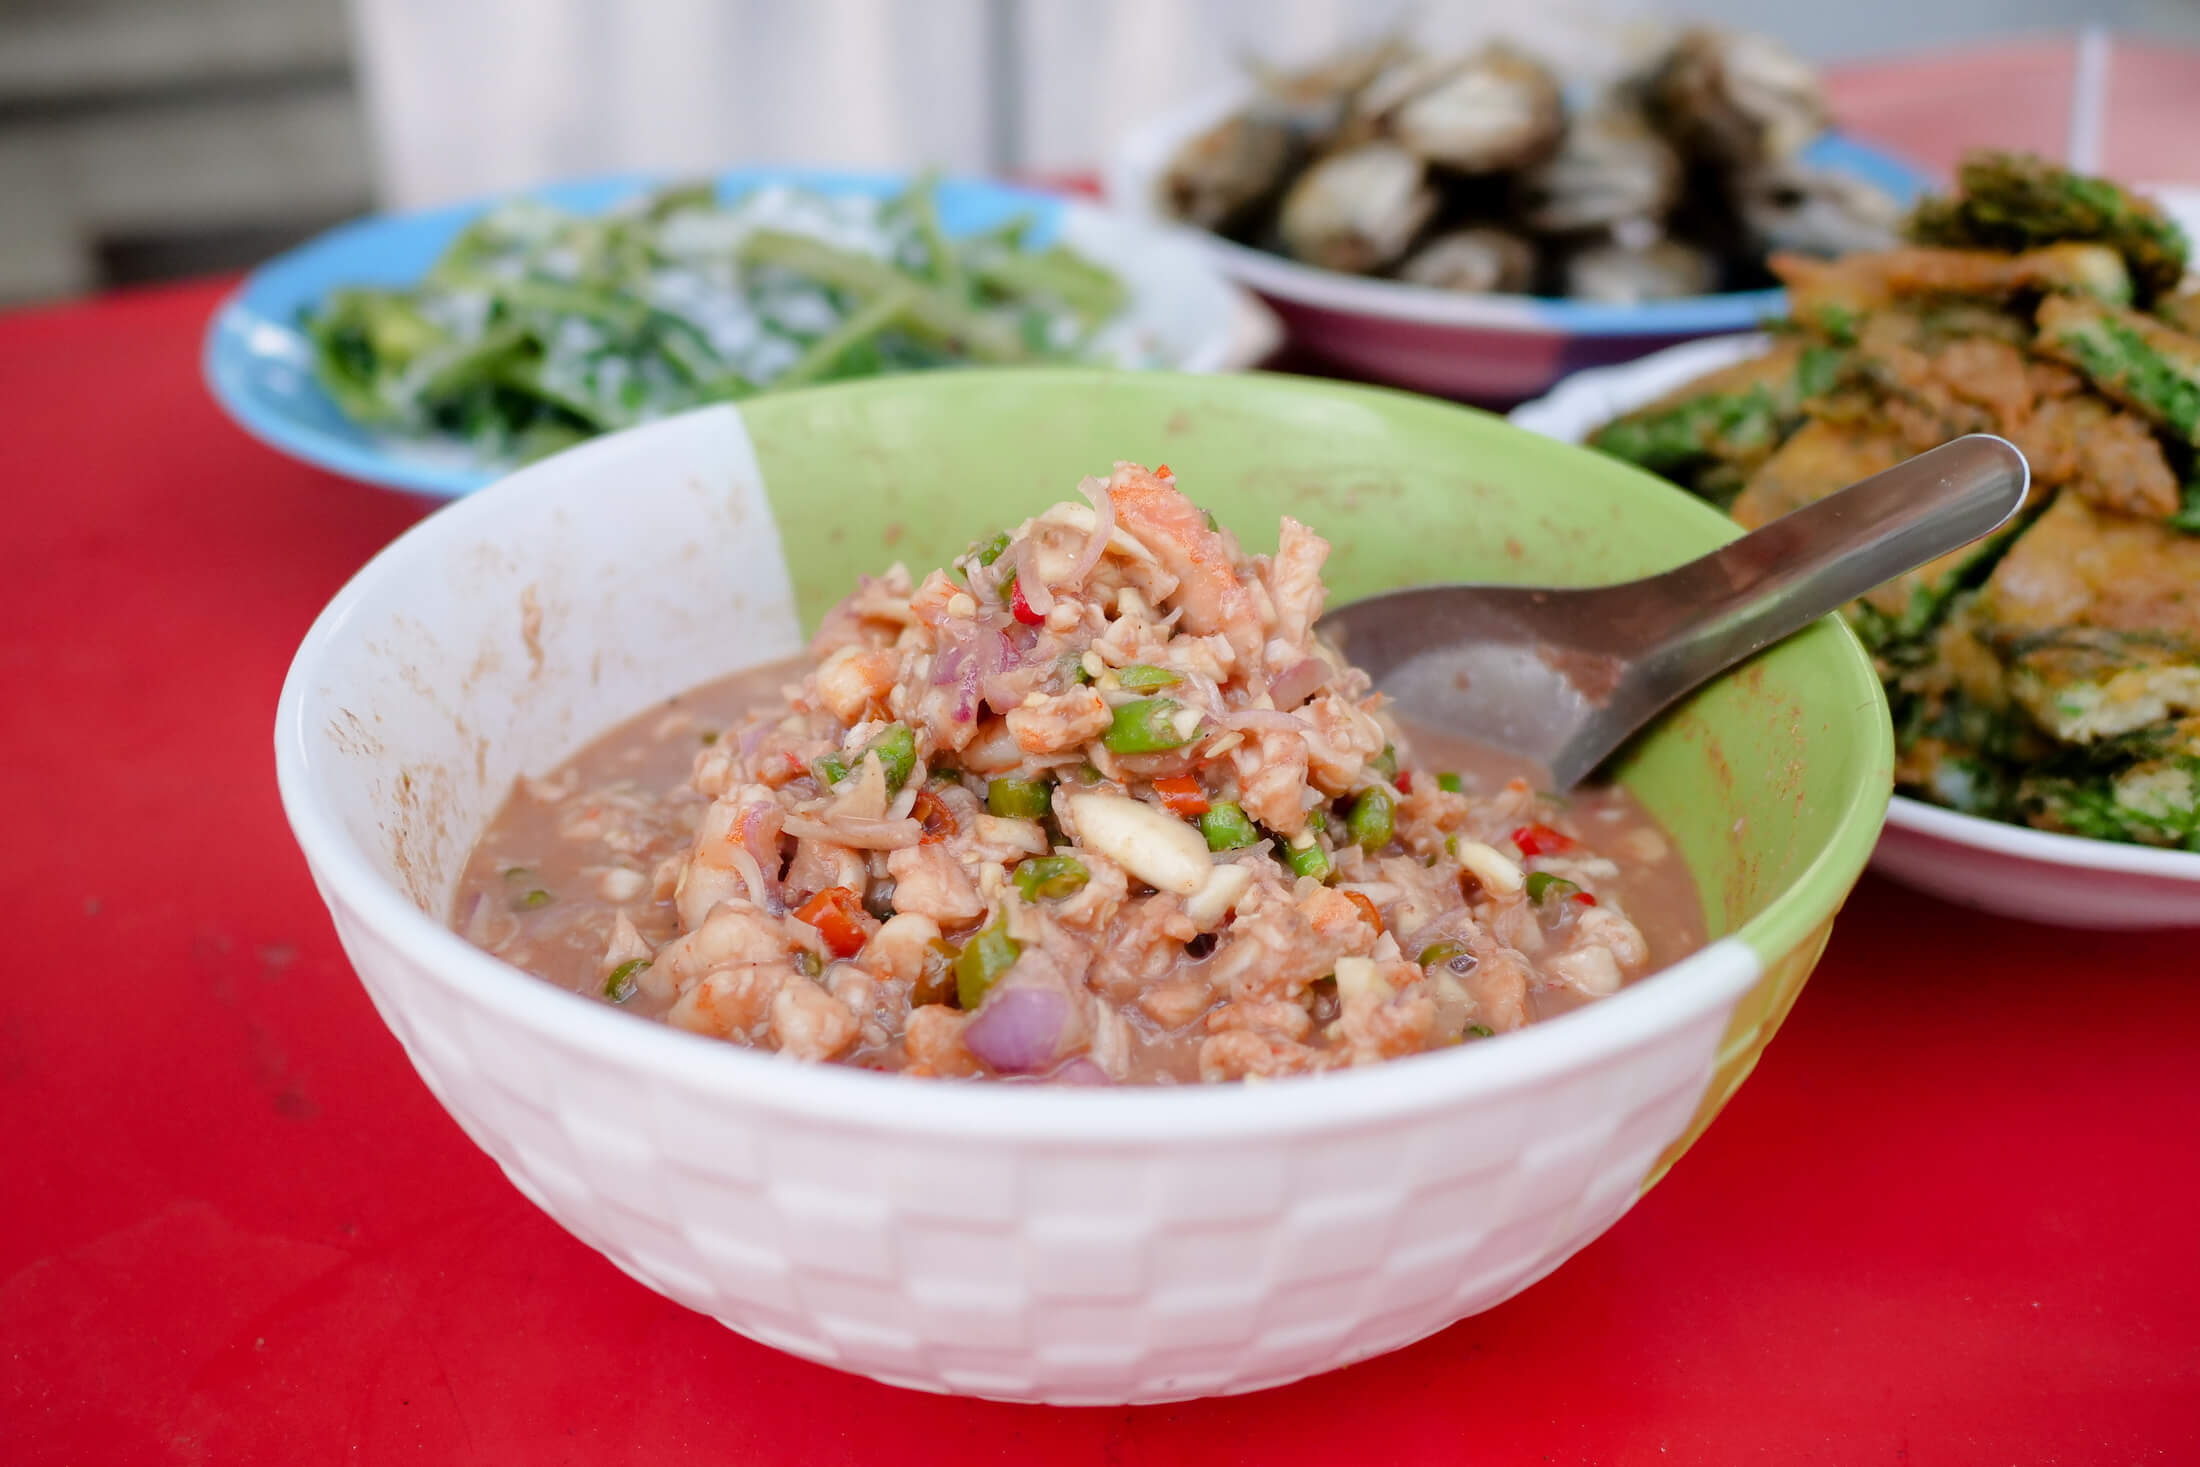
Nam prik goong sot, Southern-Thai style shrimp chili dip
Shrimp Chili Dip (นำ้พริกกุ้งสด) or “nam prik goong sot,” is a popular Southern Thai dish that is enjoyed all throughout the country of Thailand as well.
All its ingredients are hand chopped, which is a style common in southern Thailand. This type of chili dip does not require the use of a mortar and pestle.
When cooking Thai food, try and always use the most fresh and highest quality vegetable ingredients you can find.
Finally, be sure to leave a comment below to let me know how you enjoy this recipe from EatingThaiFood.
Note: If you’re pairing this dish with something other than Shrimp Chili Dip, then scroll down to read the 2nd part of this authentic Thai food recipe, “Morning Glory with Coconut Cream.”

Freshly peeled garlic and bright purple shallots
Prepare (เตรียมไว้ก่อน)
1 Large basin (to wash the shrimp)
1 Medium Sauce Pan (fill halfway with water)
1 Measuring cup (increments of 50mL are good)
1 Mixing bowl
Knife and Cutting Board
Food Ingredients (ส่วนผสม)
500g of shrimp (กุ้งสด)
40g of garlic (กระเทียม) (About 12 to 15 large cloves)
40g of shallots (หอมแดง) (about 8 medium Thai shallots)
50g of Thai bird’s eye chilis (พริกขี้หนูสวน) (approximately 40 to 50 small chili peppers)
50g of Fermented shrimp paste (กะปิ) “Ga-pi”
5 Limes (or, enough to make 100-150mL of fresh lime juice)
1T of Palm sugar (or cane sugar, or brown sugar)

Peeling shrimp can be fun, try to keep that head oil intact
Instructions (วิธีทำ)
Step 1
Peel the shrimp in a way that it removes the legs, back covering shield, and tail, but leaves the head oil intact and attached to the torso.
After peeling all the shrimp, wash gently but thoroughly, rinsing until the water is clear.
Take your Medium Sauce Pan, filled with just enough water to cover the shrimp.
Dump all the shrimp into the pan, and bring the heat to medium-high. You will notice that as the water boils, it will turn to an orange color from the shrimp head oil.

The water will turn orange from the shrimp head oil
Gently stir the shrimp once or twice to separate them, making sure they are all cooking evenly.
The shrimp should cook only until just done, approximately 5 to 6 minutes, to avoid the shrimp being too rubbery in texture. Then, using a spoon, move them into a separate serving bowl to avoid further cooking.
Do not discard the water from the cooking of the shrimp (there should be 300-400mL of water).

Roast the ga-pi paste until you smell the wonderful shrimpy fragrance
Step 2
50 g of Fermented shrimp paste (กะปิ) “Ga-pi” is approximately three rounded tablespoons.
Clump it together in a single large chunk for dry roasting. Flatten the ga-pi until it is a disc about 2 inches in diameter and a half-inch thick.
Place the lump of ga-pi into the dry pan (this can also be roasted over fire, traditional style).On very low heat, as low as possible, dry roast the shrimp paste just enough to bring out its fragrance.
Dry cook the Ga-pi on each side for around three minutes, or for about 1 minute more after it begins to smell strongly. Flip it over, and cook for another 3-4 minutes.
When the ga-pi is done, now its time to start adding the flavors together.
Grab your measuring cup, and squeeze the juice of about five limes out into the cup (remove the seeds), this should yield more than 100mL of lime juice. Remove any seeds that fall in as well, as they will make it bitter.
Now remember, for the next steps you will want to taste test. This is important to these recipes and all Thai cooking as well, learn to taste as you go because fresh ingredients can vary when it comes to sourness, saltiness, and sweetness.

Chopped shallots, chilis, and garlic, waiting for the ka-pi paste and lime juice
Step 3
Roughly chop the garlic, shallots, and chilies, add them into the serving bowl.
The shrimp should now be cool enough to touch, so roughly chop the shrimp and add it into the serving bowl as well.
Crumble the roasted shrimp paste into the serving bowl – it should be quite dry on the outside, but still slightly damp on the inside, and very strongly smelling.
Scoop out 200 ML of shrimp water, and pour half of it over the ingredients in the serving bowl.
Stir it up a bit, until the ga-pi starts to mix with the liquid. Shrimp Chili Dip as a dish will be approaching max levels in almost all the main flavor profiles – It will be very spicy, salty, and sour, and finally, mildly sweet as well. Taste test. Adapt slightly to your own preference. Proceed.

Pour on about 100mL of lime juice, watch for seeds
Pour 100 ML of fresh squeezed lime juice into the serving bowl. This is going to be mixed by hand so you may want to use a plastic bag (If using your bare hands, be careful to wash, and remember to not touch your eyes for a few hours at least).
After mixing all the ingredients in the serving bowl, add another 100 ML of shrimp water and continue mixing. The consistency will be clumpy, the shrimp paste mixed entirely into the liquid though, and be sure to taste test and add more lime to personal preference.
Notes on Sugar:
Traditionally using sugar collected from Taan palm fruit, commonly grown throughout southern Thailand, it is also common nowadays to use local sugar from sugarcane (or brown sugar). Depending on personal preference, add sugar in small amounts, mix and then check to taste, in total no more than 1 tablespoon of sugar.
We did not add any sugar at all to ours, and we added extra lime juice at the end – so this dish really is one that can be widely customized to different tastes.
After a final taste test, if you prefer a more sour flavor, add fresh lime juice in increments of 1 to 2 tablespoons at a time.
Enjoy this recipe of Authentic Thai food, and see our full meal recommendations for Eating Thai Style at the end of this article.

Not mandatory, but usually safer when mixing chilies by hand
2. Morning Glory with Fresh Coconut Cream (ผักบุ้งราดกะทิสด)
“Pak Boong Rad Ga-ti Sod“
Note: It is possible to make this dish using coconut milk from a can. This will not taste nearly as good though as it does when you make fresh coconut cream yourself.
Cooking this food as an authentic Thai food recipe, you will need to make your own fresh coconut cream.
Read this article on how to make your own fresh coconut cream (link here).
Now that the Shrimp Chili Dip Recipe is under way we can move on to preparing the recipe for Morning Glory with Fresh Coconut Cream (scroll down).

A simple, easy to make, yet incredibly delicious dish of Thai cuisine
Prepare (เตรียมไว้ก่อน)
2 Large Mixing Bowls
1 Medium Sauce Pan (and fill it half-full of water)
1 Ladle
1 Large Spoon
1 Serving Plate
Food Ingredients (ส่วนผสม)
300mL of Fresh Coconut Cream (from the first recipe (link here))
500g of Thai Morning Glory (a large Bunch is about 500g including stalks) (Wikipedia article)
2g of Salt
Instructions (วิธีทำ)
Rinse the vegetables, cleaning them of dirt around the base of the stems (Morning Glory stalks are hollow)
Take your knife and the large mixing bowl. Remove the large leaves and soft upper portions of the stems, placing them into the bowl. Cut away the thicker rigid lower portions of the stems and discard them.
You’ll be left with 200-220grams of the Morning Glory (this is a very light vegetable).
Note: We use morning glory for this recipe, but you can use any crispy green leafy vegetable.

Use the large leaves and young shoots of each stalk
How to cook Morning Glory (วิธีทำผักบุ้งราดกะทิสด)
Fill the medium sauce pan with enough to completely cover the morning glory, and bring it to a rolling boil.
Fill the second mixing bowl with water (ice water if you want, this will be for the morning glory immediately after its done cooking)

You want a rolling, hard boil here for the Morning Glory
When the water in the sauce pan begins to boil, add a large pinch of salt, about 2g. Add all of the tender shoots, leaves, and upper portion of the Morning Glory stalks into the boiling water.
Make sure all of the vegetable is submerged to that it does not cook unevenly. The water will almost instantly turn green, and the vegetable will soften in just 20 to 30 seconds. The vegetable should still be crisp, not soggy at all.

Evenly dipped into cool water immediately, after less than a minute of cooking time
To keep it from cooking further, use a large spoon or lade and move all of the vegetable to the mixing bowl full of water and stir to cool the vegetable, again completely submerging it in the water. Dump out the pot of hot water.

Look how thick that cream is when you skim it gently off the top
When the morning glory is cool, pour off the water and move the vegetables on to a serving plate. Make sure the coconut cream has cooled, and then With a spoon, scoop in a motion that skims off only the top layer of coconut cream each time, dumping each spoonful over the morning glory vegetable on the plate until all 300mL of the cream is used.

Eventually you will cover the whole dish in fresh coconut cream
How to Eat Thai style:
I would recommend eating a mix of Southern Thai-style dishes with this. A meal including this dish of Morning Glory with Fresh Coconut Cream would go great with an extremely spicy fried dish like Shrimp Fried with Petai Beans, “Pad Sataw Goong Sod,” Fried Mackarel, “Pla-Tu Tod,” and an egg-only omelette, “Kai Jeow.”
More Ingredient Notes:
In Thai, the name of this vegetable is “Pak Boong.” The type of Morning Glory most common in home-cooking in Thailand has a thick, large stalk. The common street food type of Pak Boong (Morning Glory) is much more thin, and less sturdy, and this is sometimes called “Pak Boong Jeen,” or ‘Chinese Morning Glory.’
For another recipe using this wonderful vegetable, check out the article here for ‘Red Fire Morning Glory,’ or “Pak Boong Fai Daeng.”